


If you find that your room is not spacious enough for both a bed and a desk or other furniture, the loft bed may be the solution. This is provided you’re not intimidated by the thought of climbing high to get to sleep.
A loft bed is accessible by stairs or a ladder. It’s more like a bunk bed without the lower bunk, leaving room beneath it for a desk, storage, fort or even a play area. Loft beds are endlessly customizable, and the building your own allows you to create exactly what you want.
You don’t have to sacrifice design and comfort when living in a tiny space. Knowing how to build a loft bed is a great way to keep your room as spacious as possible. But loft beds are not just for tiny homes; the fact that they are space efficient is a big advantage, but they can add a great sense of coziness or personal style to even large rooms.
Adult loft beds come in a wide range of options, such as size, shape or material. If you like more traditionally-styled rooms, a wooden loft bed will blend in nicely with your other furniture and decor. In contrast, those who love the sleek lines and minimalism of the modern look will prefer a metal loft bed.
The most common loft beds are made out of wood, often pine, oak or aspen. There are different types of loft beds, which may include:
Loft bed with a desk
Probably the most popular loft bed design. This loft style features a bed on top with a desk or work station underneath. It’s classy and a nice design to make your room bright.
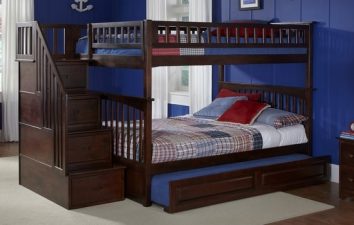
Loft bed with stairs
A ladder can be difficult for those who are injured, older, or lack mobility. Stairs are a safer alternative and still offer all the other benefits of lofting. As a bonus, some designs feature additional storage under the stairs.
Loft bed with a closet or a dresser
A dresser built into one side of the loft offers built-in storage, while still saving room space for other furniture beneath the loft.
Storage loft
Who doesn’t want more storage? A storage loft might incorporate cabinets, drawers or storage under the bed. Here are some cool shelves under the bed ideas from Pinterest.
Twin loft bed
In this case, we have one bed at the top and the other bed.
Loft beds with nothing underneath
Free, open space beneath a loft bed leaves room for lots of imagination or calm minimalist room space.
Loft bed with couch
Putting a couch under a loft bed offers seating or an extra bed, depending on your needs.
Before building a loft bed, there are some things that you need to consider:
Space
Measure the room, especially the space from floor to ceiling. How much high the loft bed should be will depend on the height of the ceiling. There should be enough room between the mattress and the ceiling to allow someone to sit up comfortably (preferably with several inches to allow for growth). If a bed will be placed under the loft, the height will have to be considered the same way. If you plan to install stairs, you must consider the height of the stairs, as well as the placement of any drawers (so that they do not pull out onto stair surfaces) and whether the storage will be accessed from the inside or end of the bed.
Style
Before you shop or make anything for your full-size loft bed, consider the materials and methods that you want to incorporate. Make sure they complement your house decor. Wood is the most popular material for loft beds, but metal frames are also an option. The material will change the style and vibe, so choose wisely based on your own personal taste. Also, consider the finances you have when deciding on the style to adopt.
Read more>> Tips to Painting a Tall Wall Above The Stairs Successfully
Durability
When it comes to durability, wood and metal have their pros and cons. Wood offers a vast array of colors, shapes and sizes. Wood is expensive and more complicated to work with if it’s not pre-cut, but it guarantees good results. Metal frames, on the other hand, are cheaper and provide a lightweight build and versatility. They can be painted, last a lifetime and are easy to move and maintain. The choice is yours and as such choose wisely. Here Hometalk shows you step by step process of painting a metal bed.
Comfort
Your loft bed should be durable and stylish. It should ensure that you are comfortable and at ease. We spend a third of our lives asleep, after all! You should be able to look forward to coming home to your bed to rest after a tiring day of work or school. Whatever material you choose to use for your bed, make sure you are comfortable and familiar with it. Create loft bed plans that are strong, compact and well-designed so that there is no risk of falling off.
Read more>> Oriental Rug Cleaning: 10 Easy Steps to Follow
Building a full-size loft bed
Step 1: Materials
As a project, this most importantly requires the right materials and safety measures to ensure that it goes smoothly. The structure must be built properly as any sway in the frames can lead to injuries, since the user will be sleeping fairly high off the ground. Buy enough materials for your loft bed frame to accommodate your preferred mattress size. Here Youtube will help you to find the right mattress size for you.
Choose materials carefully. If you need to move in a few months, planning a heavy built like queen loft bed (which is rare to find) with a desk below will not make moving easy for you.
Are the materials you want too use expensive? Cut your own boards and posts to minimize the cost, making sure you choose clean boards and work on a level surface. Level every board before installing screws to make sure they are straight.
Here are the materials needed for a DIY loft bed:
1 – 4 x 8 x ¾ inch plywood
4 – 4 x 4 inch at 8-ft length posts
4 – 2 x 6 inch boards, 8 ft long
6 – 2 x 2 inch, 8 ft long
Wrench
Drill
Level
Measuring Tape
Screwdriver
Nuts lag bolts, and screws
Clamping device (optional)
Step 2: Measure the Ceiling Height
A home with a large ceiling is the perfect fit for a loft bed project. It makes great use of the space above your bed and can be customized by adding storage or address and any other needs plus preferences. However, if the height of your ceiling is too low or the area is not measured correctly, you might end up installing the bed where it doesn’t fit. Use a measuring tape to determine where to install your loft bed. Consider the size of the mattress that you intend to buy and any furniture that is going underneath the loft. You can add stairs or a cute ladder on the side as well as shelves, a desk or storage below the loft bed frame.
Step 3: Construct the Loft Bed Frame
With the height of your loft space already determined, it’s time to build your loft bed frame. Cut or construct a box. Using a drill, create pilot holes in the boards where the nuts and screws will chip in. Connect the planks with the nuts and lag bolts with your wrench. Insert the plywood on top of the loft bed frame using drywall screws or install slats using screws instead; either way, the plywood or slats will hold up your mattress. Pre-drill all holes when screwing your boards together to prevent the wood from splitting.
STEP 4: Attach Legs to the Bed Frame
Drill pilot holes into the bed frame and connect the posts on each side using nuts. Make sure the legs are all level before drilling: use clamping devices to keep the legs in place on the bed frame before you finalize your drill holes.
Step 5: Attach the Rails
After firmly connecting the legs to the bed frame, attach the rails. Stand the loft bed upright. To secure the loft bed, connect the boards across the legs using your drill and screws or lag bolts. This will serve as rails, or stairs, leading to the mattress.
To hide the head of your screws, do a pre-drill, and countersink them. Wood glue can also be used to conceal.
Attaching a loft beds to the wall.
To help prevent injuries, you can secure a loft bed to the wall. Since most loft beds are constructed on a 2×6-inch frame, you can drill through the section of the frame that’s near the wall and secure the bed to the wall.
You will need:
- Wall stud finder
- Power drill
- 1/4-inch spade drill bit
- 3 1/4-inch lag screws, 1/4-inch in diameter
- Lag screw washers
- Ratchet set with hex-head sockets
- Safety glasses (for drilling)
Step 1: Mark the Studs
To locate the wall studs where the loft bed is situated, slowly slide the stud finder horizontally along the wall. When the finder beeps, it has located a stud. Mark the location of each stud on the wall with a pencil.
Step 2: Drill Holes
Drill a 1/4-inch hole from beneath the loft bed frame and into the wall stud. Drill at least three holes on the long side of the bed and two holes on the short side of the bed, if possible.
Step 3: Insert Screws
Slide a washer onto a lag screw and insert the lag screw into the first hole. Select a 1/2-inch (or 13 mm) hex head socket from the ratchet set and attach it to the ratchet. If your 1/2-inch socket does not fit the hex head of the screw, try one of the other sockets.
Step 4: Attach to the Wall
Place the socket over the lag screw’s head. Attach the lag screw into the wall stud by pumping the ratchet clockwise until tight. Install the other lag screws.
Building stairs for a loft (in this case we are using the stairs as shelves).
Step 1: Assemble Bottom Step
Assemble the bottom step by attaching the sides to the base with pocket screws and glue; then, attach the front in the same manner.
Step 2: Assemble Middle Steps
Assemble the middle step by attaching the sides to the bottom with pocket screws; then, attach the front, followed by the base.
Step 3: Assemble Top Step
Begin assembly of the top step by attaching the sides of the top step to the top compartment base with pocket holes and glue.
Step 4: Secure Steps
Attach the front and back of the top step from the inside with pocket screws and glue. Attach the top step base from underneath with pocket screws. (The top step base is NOT the same size as the top shelf compartment base.)
Step 5: Add Tread Braces
Add 1×3 tread braces to each step using pocket holes screwed from the inside. It would be easier to just screw down from the top.
STEP 6: Finish
Attach the stair treads to each stair using hinges.
Building a loft bed with a desk.
The most common configuration, the loft bed with a desk beneath is often used when dealing with small spaces. A full-size loft bed with a desk is almost every millennial turned working adult’s dream as they try to make the most of a small apartment.
Bed above and work below. Talk about a win win. The benefits of a loft bed with a desk and additional storage include:
- Multi-purpose: the area beneath the bed can double as a workspace, storage, study table, bookcase, or play area for kids
- Efficiency: Make the most out of any space
- Functional for having roommates, mostly in on-campus contexts
- Create additional floor space for other activities and furniture
- Convenient: Workspace right below your sleeping area
- Comfortable, affordable and practical
Tools and materials required:
- Air compressor and hoses
- Circular saw
- Finish nailer
- Jigsaw
- Measuring tape
- Orbital sander
- Safety glasses
- Speed square
- T-square
- Table saw
- Plumb Bob or string line and weight
- Screw gun
- Eight sheets of 3/4” medium-density fiberboard (MDF)
- Three sets of 22″ drawer glide
- One 1-1/2″ stainless steel pipe (normally used for a handrail)
- Two 1-1/2″ stainless steel pipe flanges
Step 1: Layout
One end of this particular bed will be held up by a desk with hutch, and the other end will be held up by two bookshelf towers. Instead of a ladder, there is a staircase with the desk running right into one of the stair treads, plus a fireman’s pole next to the bed.
Step 2: Design
Make a cut list by sketching out the design and determining assembly pieces and steps.
Step 3: Cut
Cut all the pieces using the table saw for long rips and the circular or miter saw for crosscuts. Marking everything will make assembly easier.
Step 4: Assemble the Desk and Stairs
It’s best to assemble the bed in sections and then install them together inside the room. Assemble the desk and stairs first as the surface of the desk and the second stair tread is the same piece of wood; one side of the desk is held up by the lower staircase, and the other side is held up by two support pieces. There is no riser for the lower staircase; the sides will be open to provide storage.
Build the bottom step with a riser and tread but leave the tread off the second step (the tread will be the end of the desk). Build the fourth, fifth, and sixth steps as one piece, and the bottom of them will sit on the desk while the top will meet the base of the bed. If you plan on painting the bed, fill all the nail holes with wood filler and caulk all the seams.
Step 5: Build the Hutch
The hutch is two simple bookshelves, assembled the same way. Lay out the sides of each unit, and then mark where you want the shelves to go. Glue and nail the shelves between the uprights. Assemble the pieces using glue and a finish gun.
Step 6: Build the Bed Frame
Cut the base of the bed frame about two inches bigger than the mattress. This allows enough extra space to tuck in the sheets. Create at least 6-inch side pieces to go around the base. You do not need a side piece for the backside of the bed. Create an additional safety railing for the front and, if desired, the open end of the bed. Assemble using glue and a finish gun.
Step 7: Fill and Finish
Fill in nail holes and caulk gaps, then prime and paint each piece. It’s best to do this outside. This way you’ll have less mess to worry about.
Step 8: Build
Install each section of the loft bed, starting with the desk. Attach ledgers to the wall for the desk, nailing it into the studs. Make sure the tops of the ledgers are at the same height as the top of the lower staircase piece. Attach the bottom of the staircase to the wall. Lay the surface of the desk on top of the ledgers and bottom steps, and then attach with wood glue and nails.
Step 9: Install
Attach a ledger to the wall for the long side of the bed. Attach one of the bookshelf units to the ledger, ensuring they are level. Attach the base to the ledger and the top of the bookshelf. Attach the end piece of the base to the wall.
Step 10: Nail Staircase
Attach the top part of the staircase nailing it into the desk and bed frame.
Step 11: Fasten Staircase
Slide the second (outer) bookshelf into place and fasten to the bed frame.
Parting short!
You are now set to build a loft bed that satsifies your needs as well as fitting comfortably in your room. Safety of course is an important element when biulding one. Ensure your loft bed is properly supported to avoid hazardous falls. Consider you budget carefully and then build a comfortable and yet cosy looft bed you’ve always dreamed of. Good Luck Mate!!!!


